Automate MongoDB database backup directly to your Wasabi storage.
Wasabi is Cloud Storage is a famous option in the storage industry. They provide an S3-compliant storage for a very affordable price. In addition to being 80% less expensive than AWS S3, they don't charge any egress cost and claim to be faster than the competition.
Well, this starts pretty well!
Prerequisites
-
Create a SimpleBackups account
-
Make sure you have your server connected to your account (the one on which your MongoDB database is hosted)
-
Have a Wasabi account (we'll cover how to create your Wasabi Bucket below)
1. Create your Wasabi Bucket
-
Sign in your Wasabi account at https://console.wasabisys.com
-
Go to https://console.wasabisys.com/#/file_manager/ and click on "Create Bucket"

-
On step 1 of the form, define the name of your bucket (we like to use our company name here)
-
Pick the region you need (think about GDPR rules, if you're an EU company)
You can keep default options on step 2 and finally confirm your Bucket creation on step 3.
And that's one good thing done, your Wasabi bucket is created!

Information you'll need in step 3:
- Your "Bucket" name, in this case "myacme-bucket"
- Your "Bucket" Region, in this case "us-west-1"
2. Create your Wasabi Credentials/Access Key
In order to grant access to your bucket, we'll need to create an Access Key.
- Go to https://console.wasabisys.com/#/access_keys and click on "Create New Access Key"
- You can go with the default options and pick a "Root User"
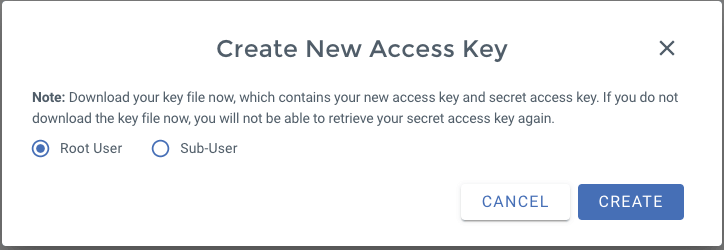
That's it you Access Key and Secret Key will be generated, make sure to write them down.

Information you'll need in step 3:
-
Access Key
-
Secret Key
3. Connect your Wasabi bucket to SimpleBackups
- Log into SimpleBackups and head to the connect your storage page
- Select "Wasabi" as storage provider and fill in the "Connect your storage" form with the information from step 1 and 2.

You'll have to input :
- Key: Access Key described in (step 2)
- Secret: Secret Key described in (step 2)
- Region: Bucket region described in (step 1)
- Bucket: Bucket name described in (step 1)
- Give your storage a name (usually we like to use the Bucket name) and click on "Save new storage".
You'll be redirected to the list of storage where you'll find your newly connected storage.

4. Final step: Create your MongoDB backup
Let's now go to SimpleBackups and get that backup configured.
From this screen you'll be able to configure what data you're backing up (MongoDB in this case), where you want it to be saved (in this case your Wasabi Bucket), and how often you want this to be done.
FYI this section will be the same, no matter what storage you pick. And that's the beauty of it, if you want to change storage, just select another one from the list (Backblaze, AWS, or whatever you might prefer) and you'll be good to go.

What would you like to back up? (A)
- Select "Database" (in this article we're creating a MongoDB backup only)
- Select the server on which your database is hosted
How often should we make this backup? (B)
-
Select your schedule option (here we picked a daily schedule)
You can select a pre-defined schedule (daily, weekly, monthly) or a custom option allowing you to schedule it whenever you want to use CRON syntax.
-
Example of CRON schedule for "20:00 every Tuesday" =
0 22 * * 2Finally, the "On demand" option won't schedule anything but will allow you to trigger the backup manually or using our API.
-
Define the backup retention, which is the number of backups you want to keep (kind of the history length of your backup if you prefer)
Choose the database you need to backup (C)
- Select the type of your database, in this case "MongoDB"
- Fill in the database connection form
Finalize and create (D)
- Pick the name of your backup (this is how it will be displayed in SimpleBackups interface) and where you want to store it.
- Select your Storage (step 3)
That's it, your MongoDB backup is now ready and connected to your Wasabi bucket.
Let us know how long it took you to get your backup fully configured (current record is 4 minutes) :-)
Run it once manually (using the "Run" backup button from the backups list) and you'll trigger your first backup!