

Automate PostgreSQL database backup directly to your Backblaze storage.
Backblaze B2 is S3-compatible, so if you already know your way around an S3 bucket and an access key pair, nothing here will surprise you. The bucket, the application key and the storage connection are the three things you need, and they map one to one onto what SimpleBackups asks for.
Below we walk through all three, then schedule your first automated PostgreSQL database backup into the bucket.
Prerequisites
-
Create a SimpleBackups account
-
Make sure you have your server connected to your account (the one on which your PostgreSQL database is hosted)
-
Have a Backblaze account (we'll cover how to create your Blackblaze Bucket below)
1. Create your Backblaze Bucket
-
Go to the Bucket page create a new Bucket

-
Fill in your Bucket name and create the Bucket
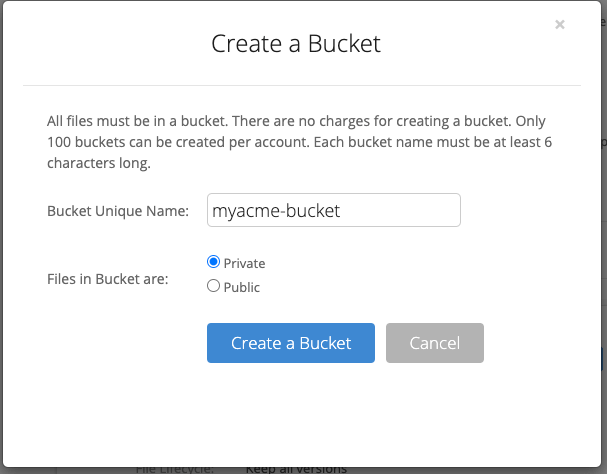
Good job! Your bucket is created.
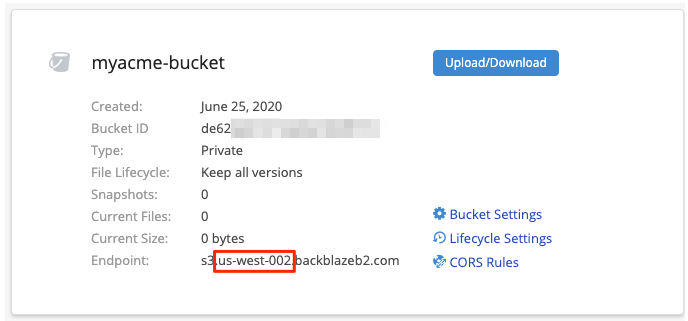
Information you'll need in step 3:
- Your "Bucket" name, in this case "myacme-bucket"
- Your "Bucket" Region, in this case "us-west-002"
2. Create your Bucket credentials
Great! Now that we have a Bucket, we need to create the credentials required to access it.
- Go to the "App Keys" page and click on "Add a new Application Key" button
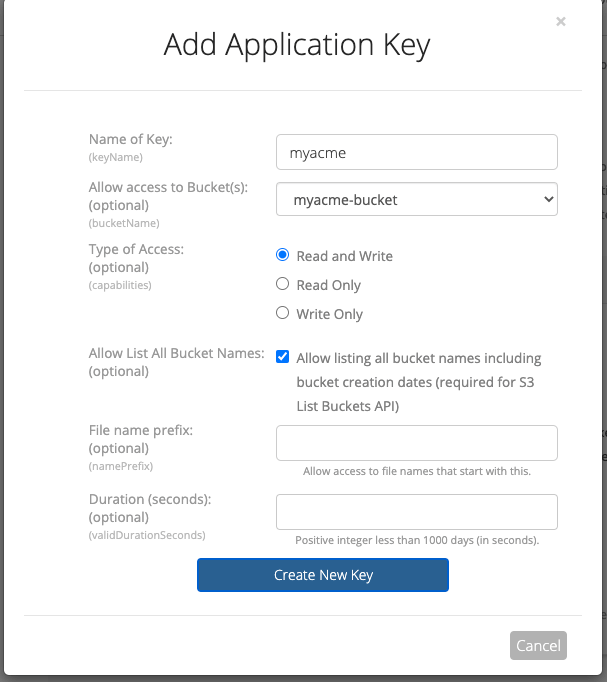
Fill in the form by defining:
- Name of the Key: we like to use a reference of the Bucket we're creating the credentials for
- Allow access to Bucket(s): Access to "All Buckets" is less secure, we strongly recommend that you select the bucket you want to use only.
Leave the rest of the option empty and create your key.
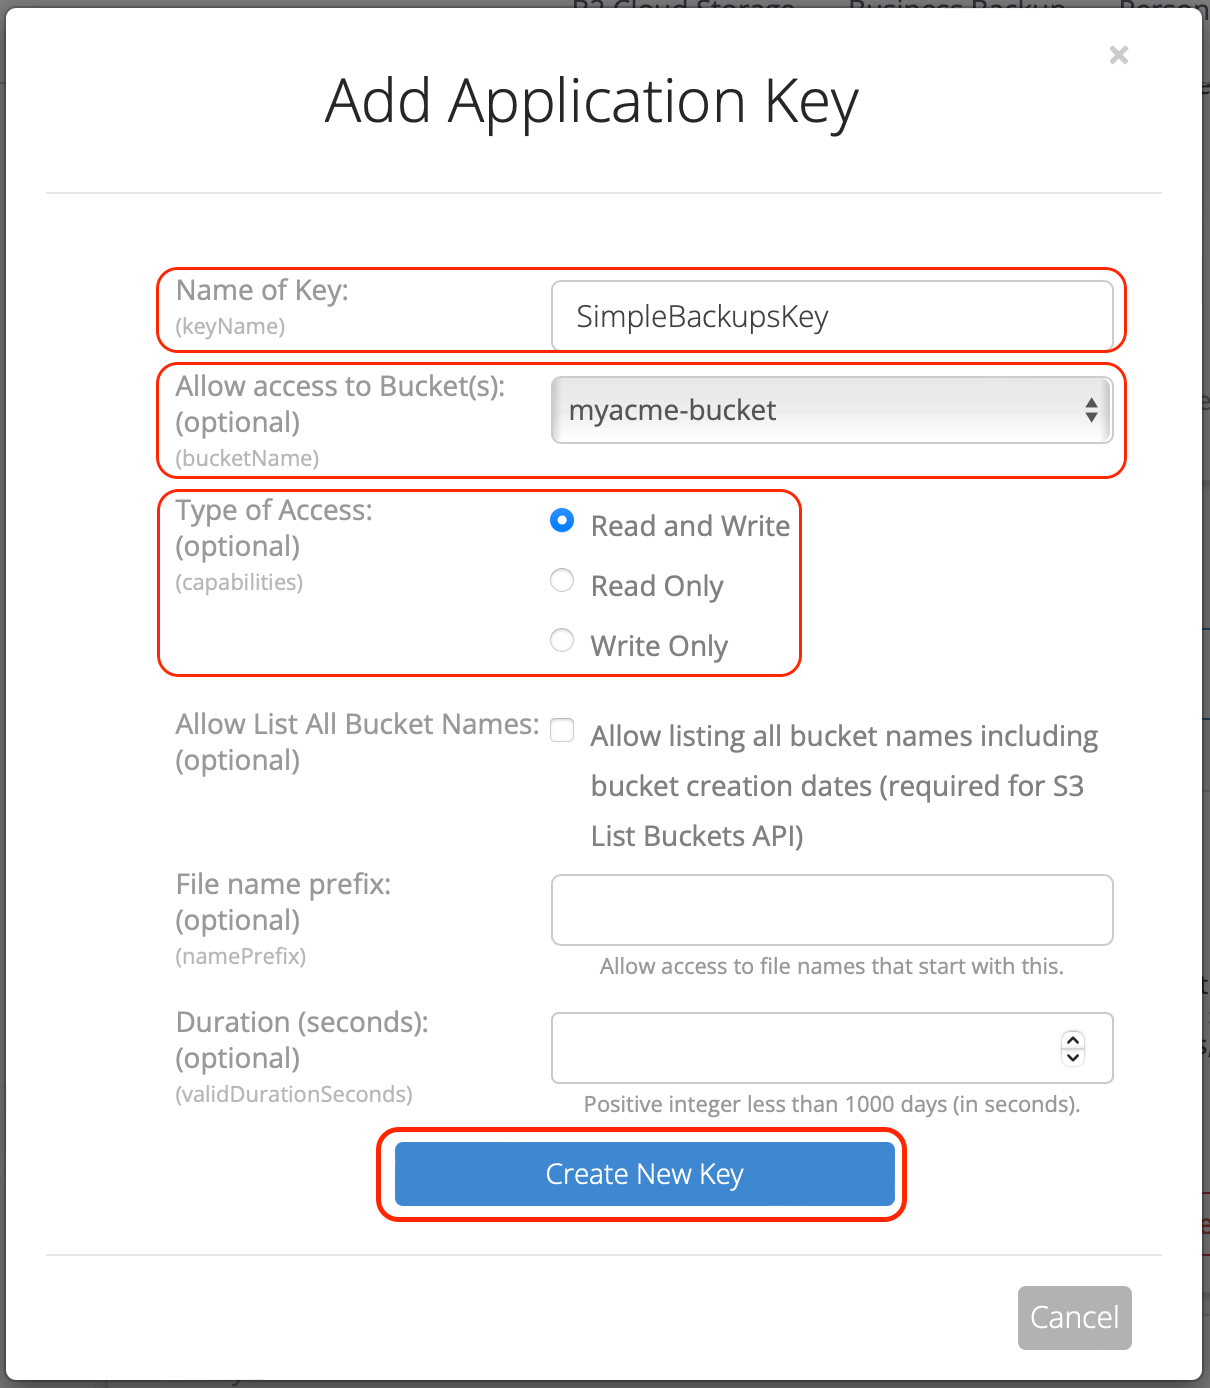
You'll get a confirmation message including your KeyID and applicationKey, which is what we need to connect your storage to SimpleBackups.
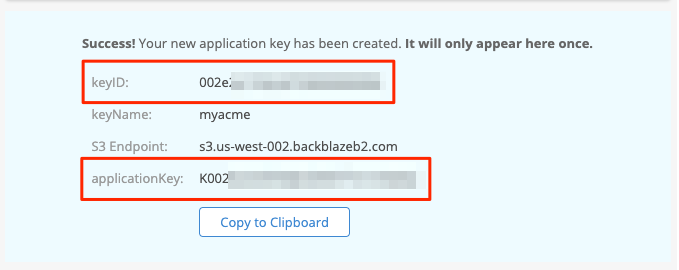
Information you'll need in step 3:
-
applicationKey
-
KeyID
3. Connect your Backblaze bucket to SimpleBackups
So far we have created a Bucket and have created the required credentials to get access to this it. The only remaining step is connecting this new storage to SimpleBackups.
- Log into SimpleBackups and head to the connect your storage page
- Select "Backblaze B2" as storage provider and fill in the "Connect your storage" form with the information from step 1 and 2.
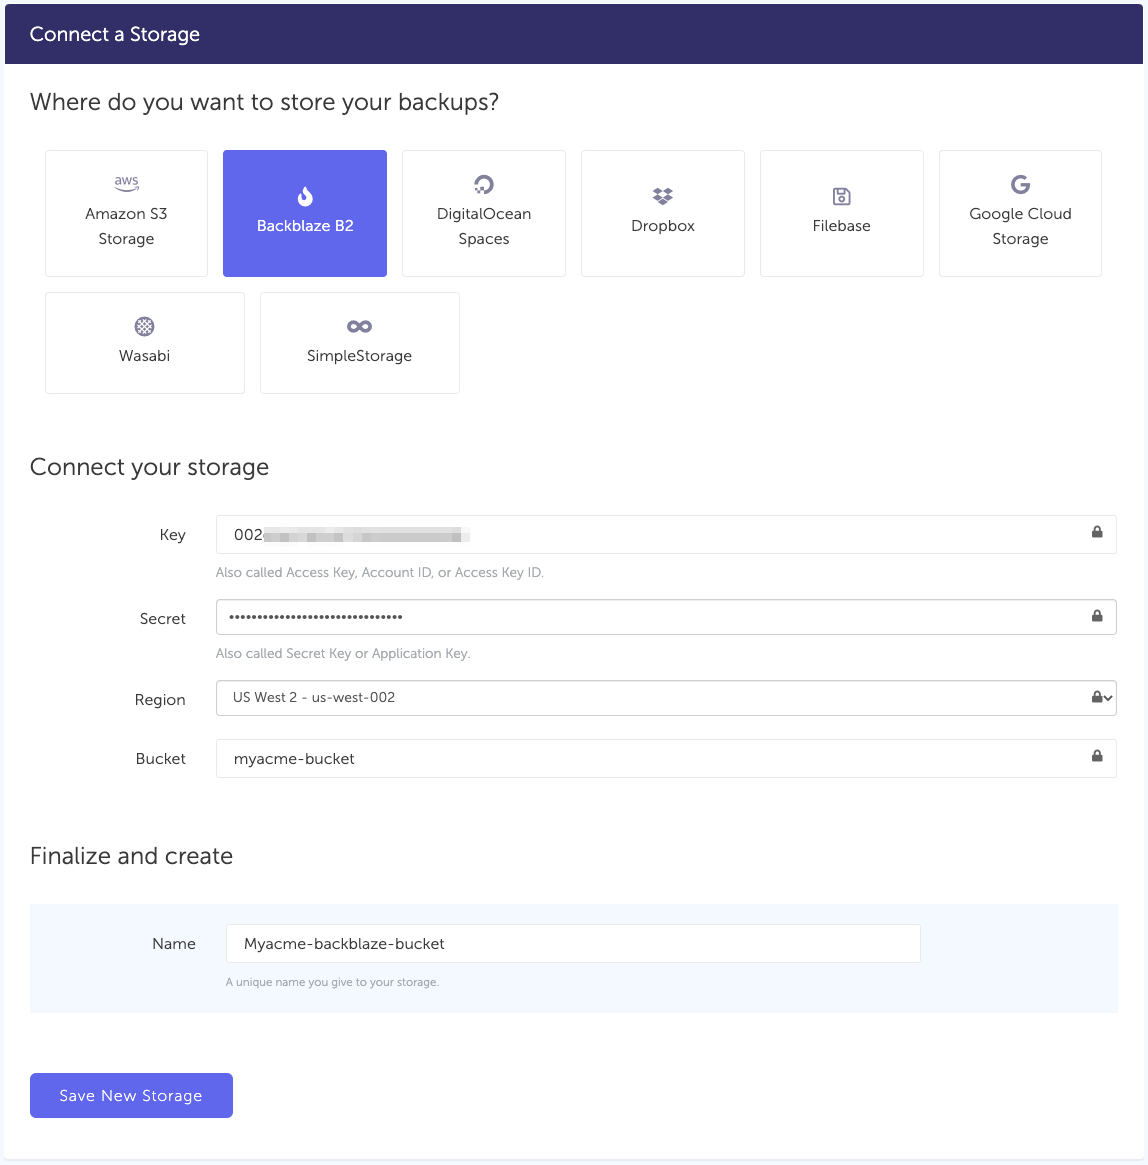
You'll have to input :
- Key: KeyID described in (step 2)
- Secret: applicationKey described in (step 2)
- Region: Bucket region described in (step 1)
- Bucket: Bucket name described in (step 1)
- Give your storage a name (usually we like to use the Bucket name) and click on "Save new storage".
You'll be redirected to the list of storage where you'll find your newly connected storage.

...Yes, that's all it takes !
4. Final step: Create your PostgreSQL backup
Now it's time to head to the create backup page.
From this screen you'll be able to configure what data you're backing up (PostgreSQL in this case), where you want it to be saved (in this case your Backblaze Bucket), and how often you want this to be done.
FYI this section will be the same, no matter what storage you pick. And that's the beauty of it, if you want to change storage, just select another one from the list (Backblaze, AWS, or whatever you might prefer) and you'll be good to go.
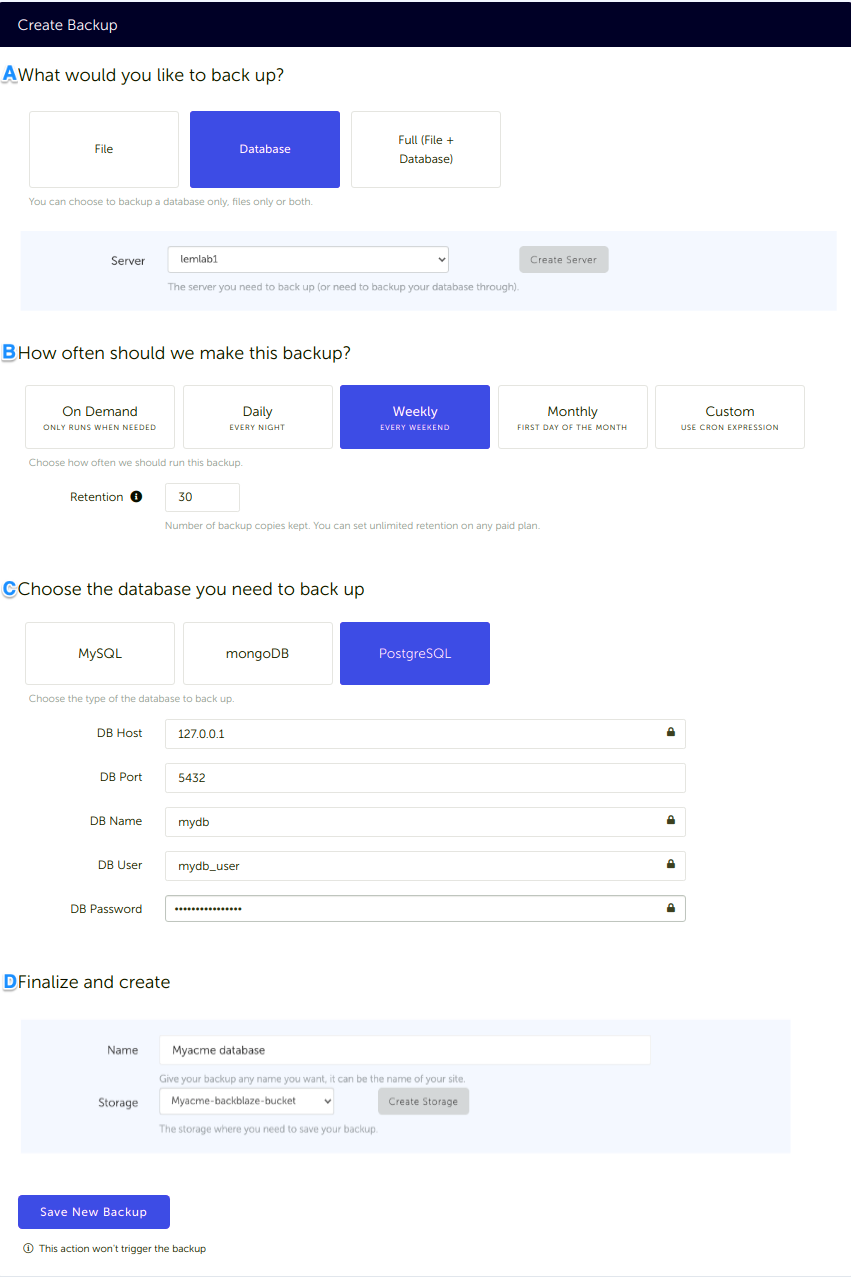
What would you like to back up? (A)
- Select "Database" (in this article we're creating a PostgreSQL backup only)
- Select the server on which your database is hosted
How often should we make this backup? (B)
-
Select your schedule option (here we picked a daily schedule)
You can select a pre-defined schedule (daily, weekly, monthly) or a custom option allowing you to schedule it whenever you want to use CRON syntax.
-
Example of CRON schedule for "20:00 every Tuesday" =
0 22 * * 2Finally, the "On demand" option won't schedule anything but will allow you to trigger the backup manually or using our API.
-
Define the backup retention, which is the number of backups you want to keep (kind of the history length of your backup if you prefer)
Choose the database you need to backup (C)
- Select the type of your database, in this case "PostgreSQL"
- Fill in the database connection form
Finalize and create (D)
- Pick the name of your backup (this is how it will be displayed in SimpleBackups interface) and where you want to store it.
- Select your Storage (step 3)
That's it, your PostgreSQL backup is now ready and connected to your Backblaze bucket.
Run it once manually (using the "Run" backup button from the backups list) and you'll trigger your first backup. If anything in the setup did not match what you saw, let us know.
FAQ
Which Backblaze B2 credentials does SimpleBackups need?
An application key, which gives you a keyID and an applicationKey. The keyID goes in the Key field and the applicationKey in the Secret field. Scope the key to the single bucket you back up to rather than to all buckets.
Where do I find my Backblaze bucket region?
The region is part of the bucket endpoint shown on the bucket details page, for example us-west-002. SimpleBackups needs it alongside the bucket name to connect the storage.
Can I use the same Backblaze bucket for more than one database?
Yes. Each backup writes to its own path inside the bucket, so several PostgreSQL databases can share one bucket and keep separate retention settings.
How do I restore a PostgreSQL backup stored on Backblaze?
Download the dump from the bucket, then restore it with psql for a plain SQL file or pg_restore for a custom-format archive. The restore guide covers both paths and the errors that come up most often.
Keep learning
- The ultimate PostgreSQL backup script, if you would rather own the
pg_dumpand upload pipeline yourself. - pg_dump and pg_restore guide, for the dump options behind whichever route you pick.
- How to restore a PostgreSQL backup, because a backup you have never restored is an assumption.
Scheduling, retention and restores across every destination are covered on the managed PostgreSQL backup page.
This article is part of The complete guide to PostgreSQL backup, an honest, practical reference from the team that backs up PostgreSQL every day.