How to Back up AWS RDS (PostgreSQL) with SimpleBackups


Amazon’s Relational Database Service (RDS) is a managed relational database service provided by AWS. As such, it’s a perfect solution to store and organize your data in a SQL database in the cloud.
However, you should back up your databases regularly to ensure reliability. And when it comes to backing up your AWS RDS and getting the most from the platform, SimpleBackups is the perfect solution.
This post will show you a step-by-step guide to backing up your RDS PostgreSQL database using SimpleBackups.
Obtaining Your RDS Connection Credentials
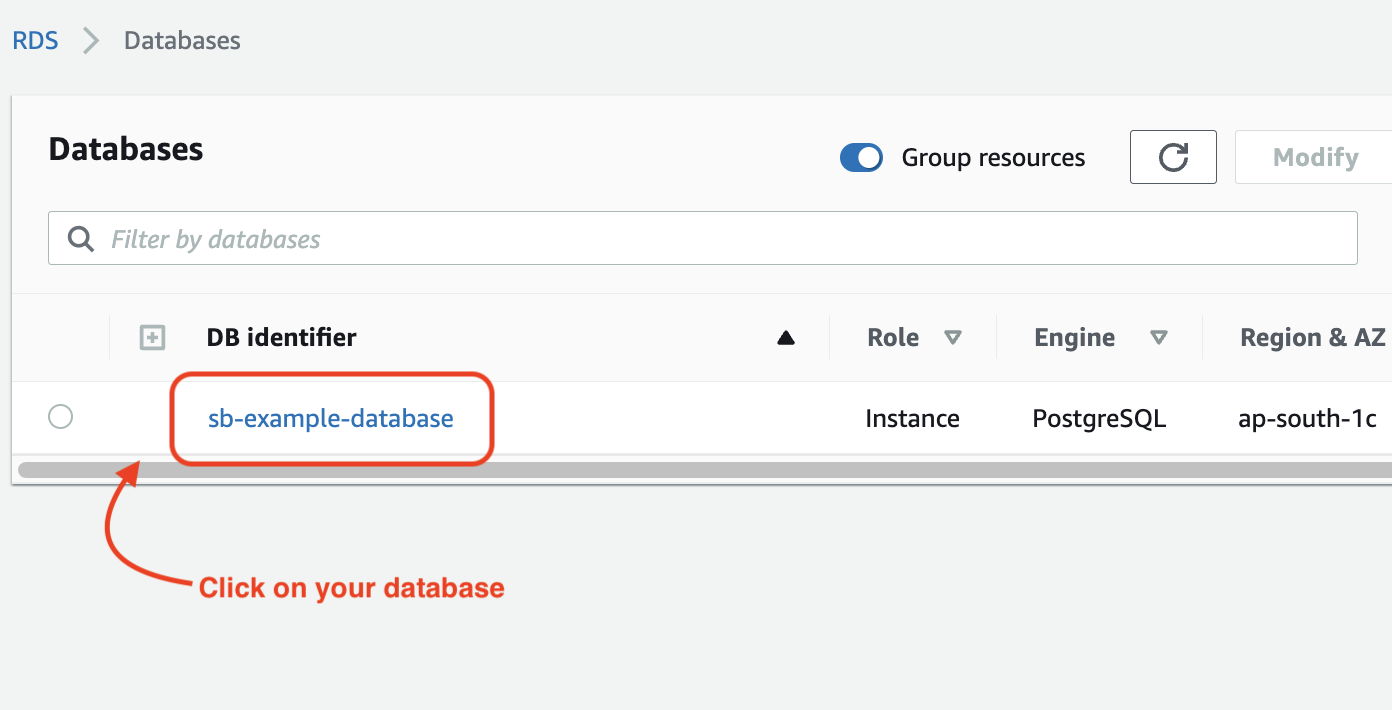
Before you get started, you’ll need your RDS connection credentials. These will allow you to enable remote PostgreSQL connections for AWS RDS. You’ll first go to your Databases page on your AWS RDS account.

On this page, you’ll see a list of your database instances.
You can then choose your PostgreSQL database from the list of instances.
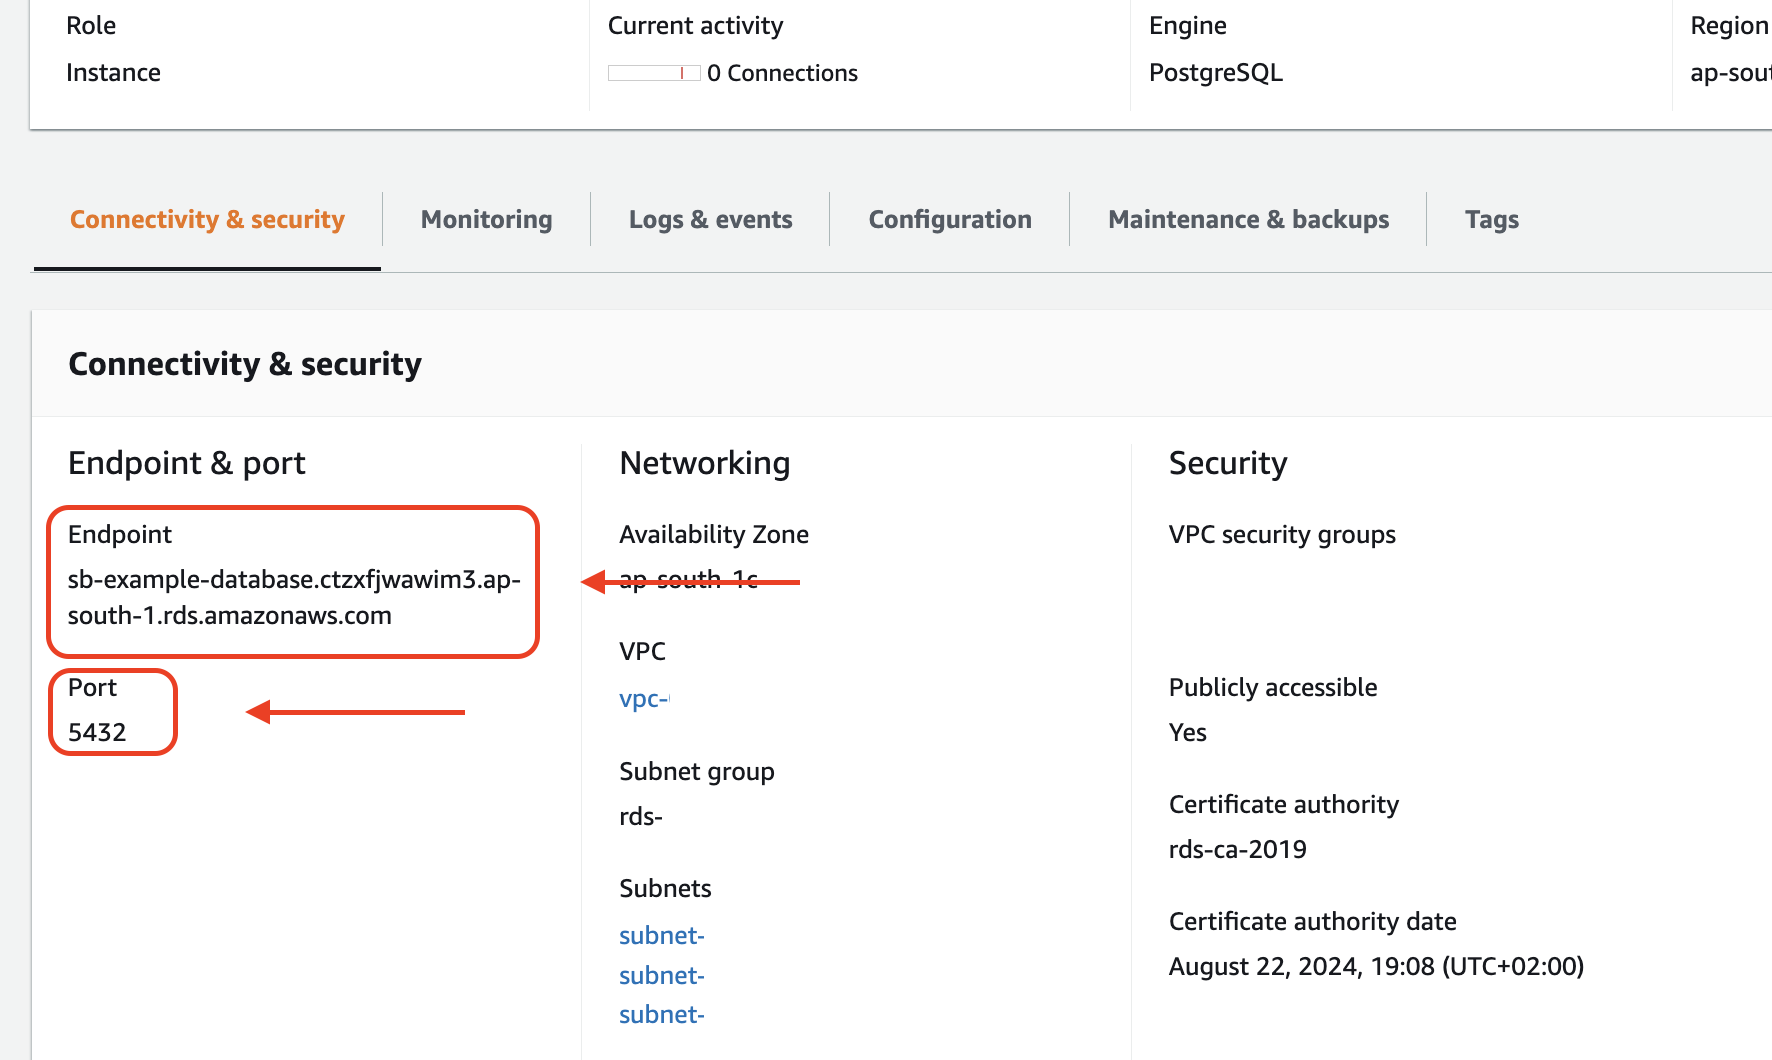
Once you’ve clicked on the database instance, a page will open where you’ll find the information for your database.
From here, you’ll need a few pieces of information. First, you’ll need the endpoint and the port of your database. You can get this information under the Connectivity & Security tab.
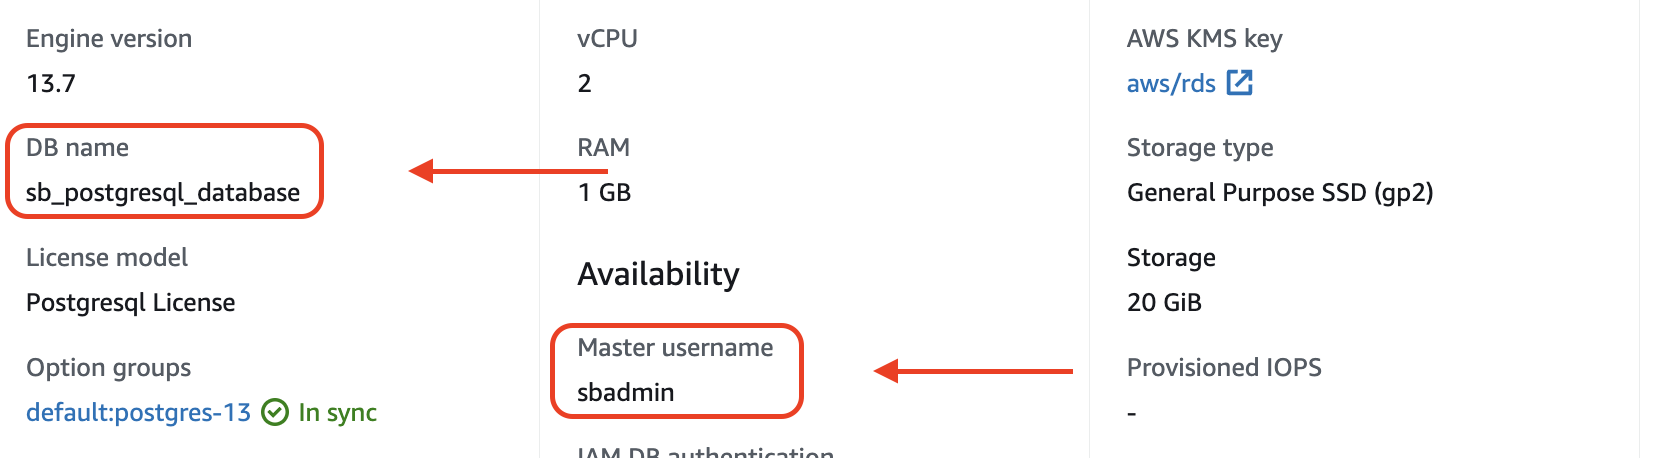
You’ll also need the database name and username. You can get these under the Configuration tab.
How to Create Your AWS RDS (PostgreSQL) Backup
Once you’ve obtained your RDS connection credentials, you can set up your backup in SimpleBackups. We’ll now look at the steps you’ll follow to do this.
Step 1: Getting to Your Dashboard
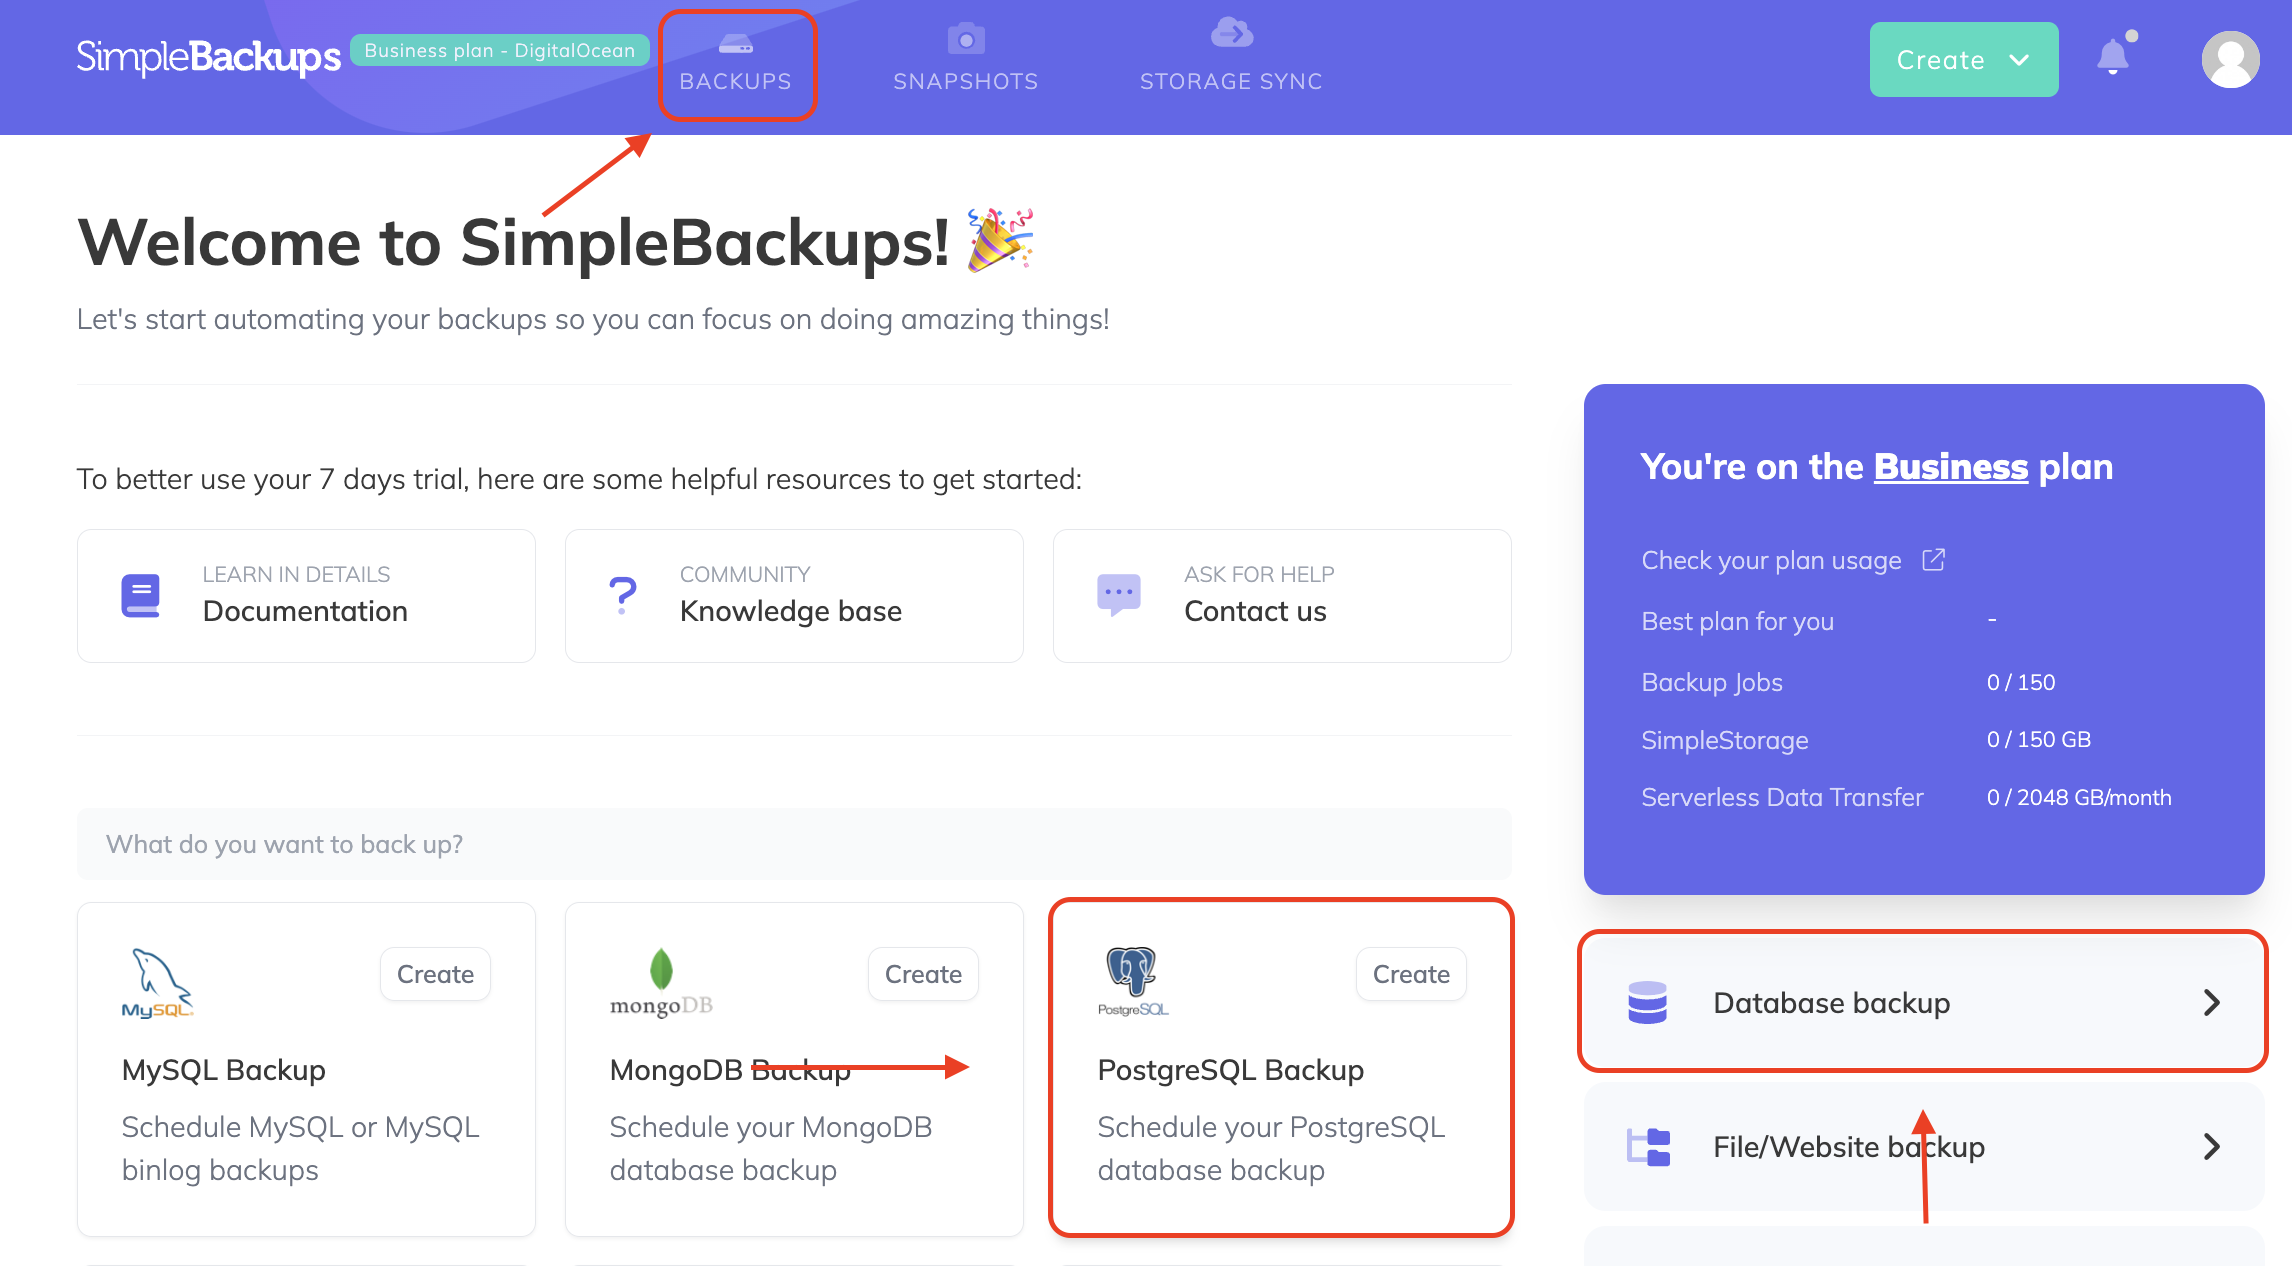
The first step is logging into your SimpleBackups account.
You have a few options for creating a PostgreSQL backup.
You can either click on Backups in the menu bar, click Create on the PostgreSQL Backup tile, or click on Database backup in the right menu.
If you click on the Backups option in the menu bar, you’ll be taken to another screen which displays a list of your backups.
To get started, you can then click Create Backup.
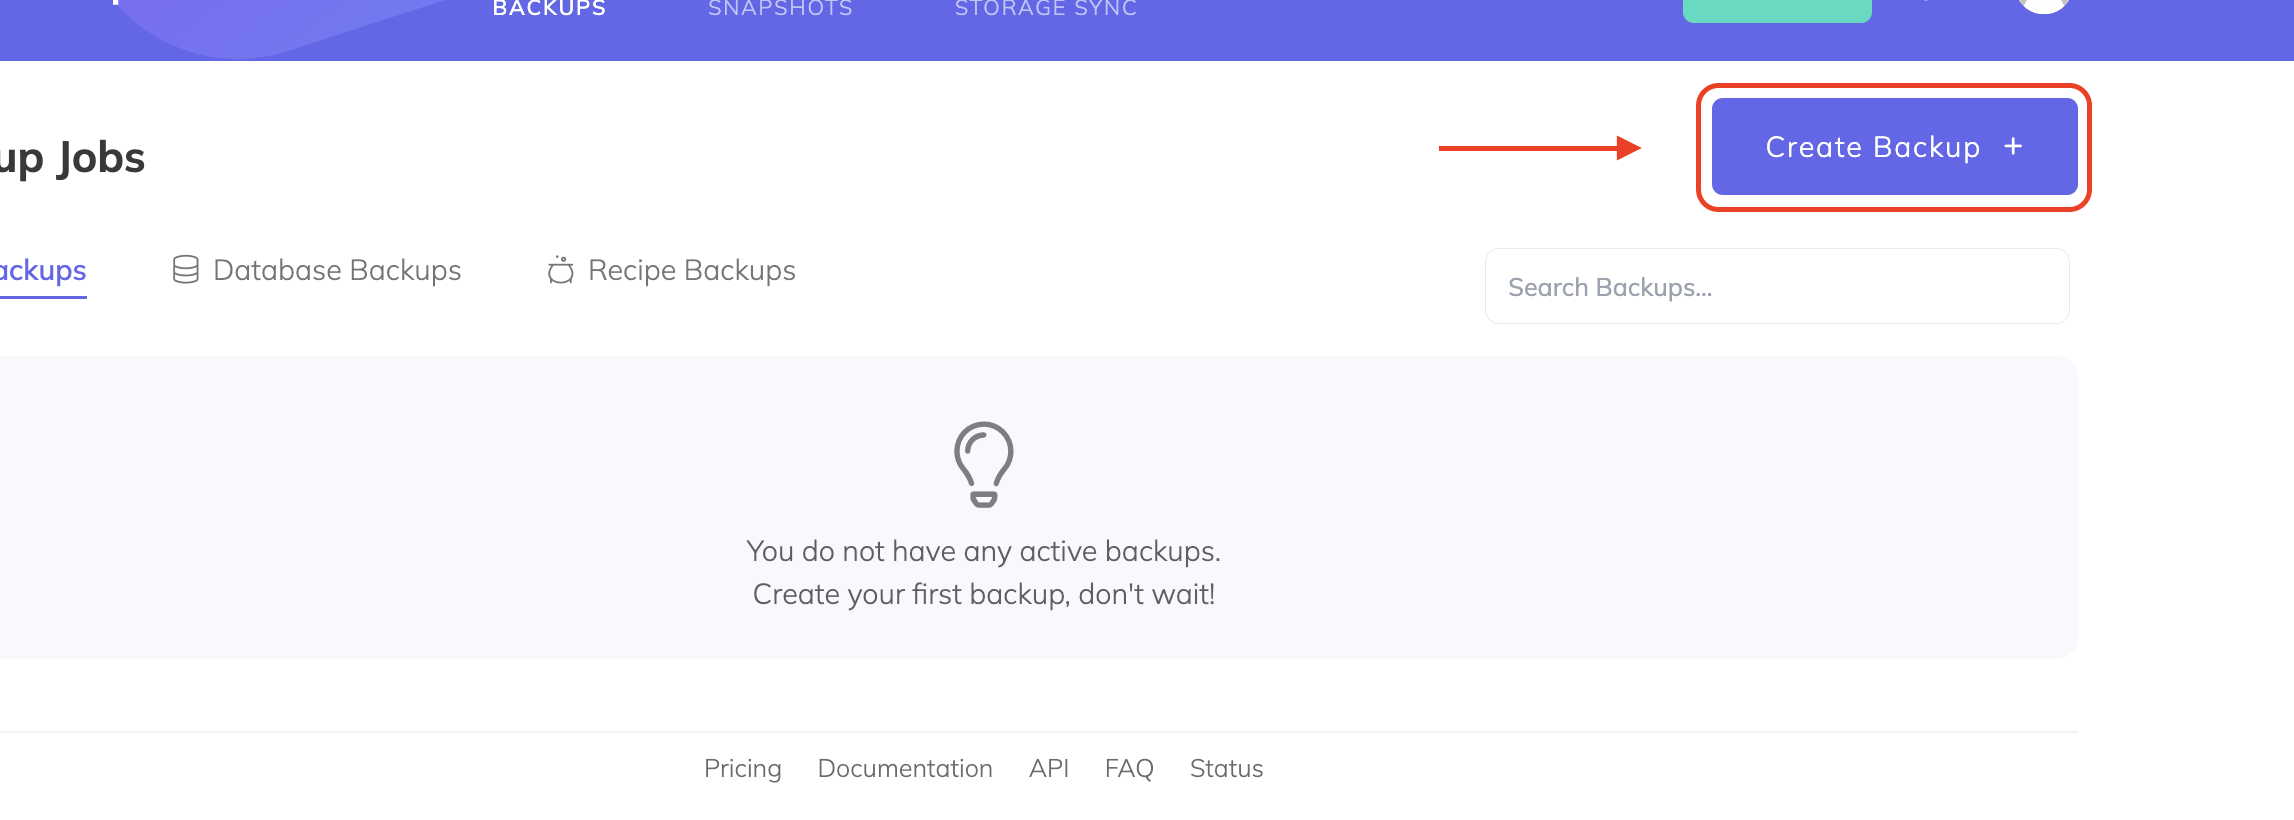
No matter which option you choose, you’ll get to a screen where you can configure and create your backup.
On this screen, you should ensure that the Databases option is selected.

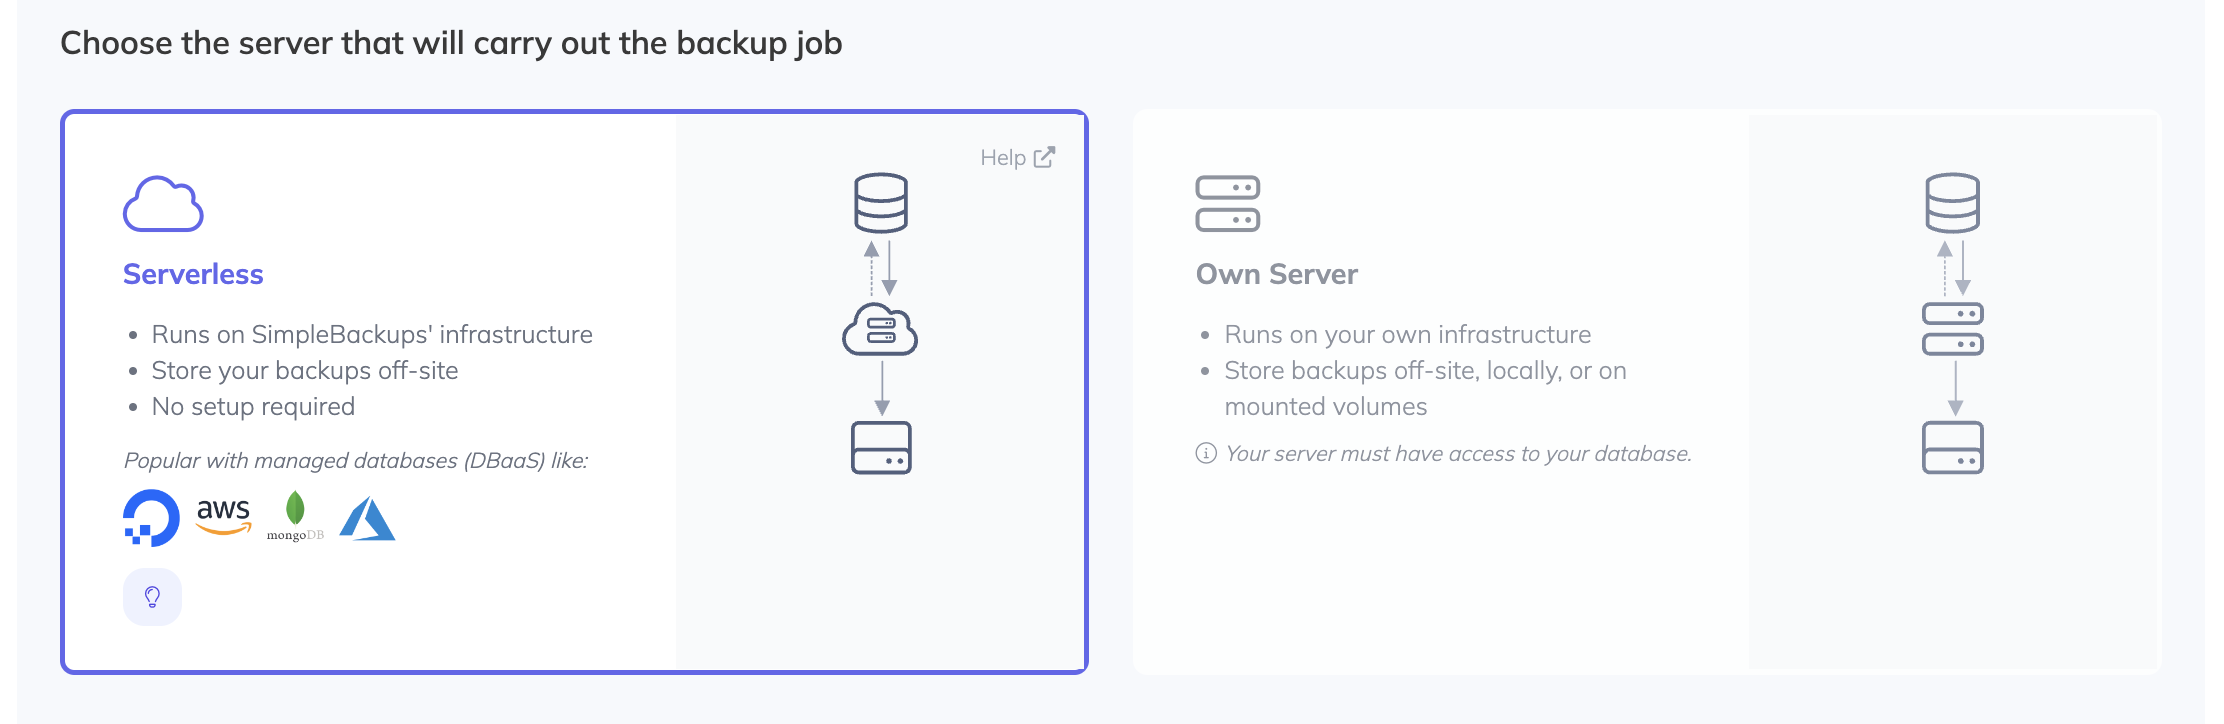
Step 2: Choose Your Server
The first step in configuring your backup is deciding what server you’d like to use. Here, you have two options:
- Serverless. This option allows you to perform the backup using SimpleBackups’ infrastructure and does the job of securely backing up your database and uploading it to your remote storage without needing to add your own server. It’s the ideal option if you don’t have a dedicated server. It’s also helpful when your database is larger than the available space on your server.
- Own Server. With this option, you’ll add your own server and the backups will run on your infrastructure. In this case, your server needs to have access to your database, and you can store your backups off-site, locally, or on mounted volumes.
Depending on your unique requirements and whether you have your own server with enough space, you can then select the appropriate option.
Apart from choosing one of these options, you should also select if your database is publicly available.
When it comes to RDS, you’ll typically decide whether the database is publicly available when you create it on AWS.
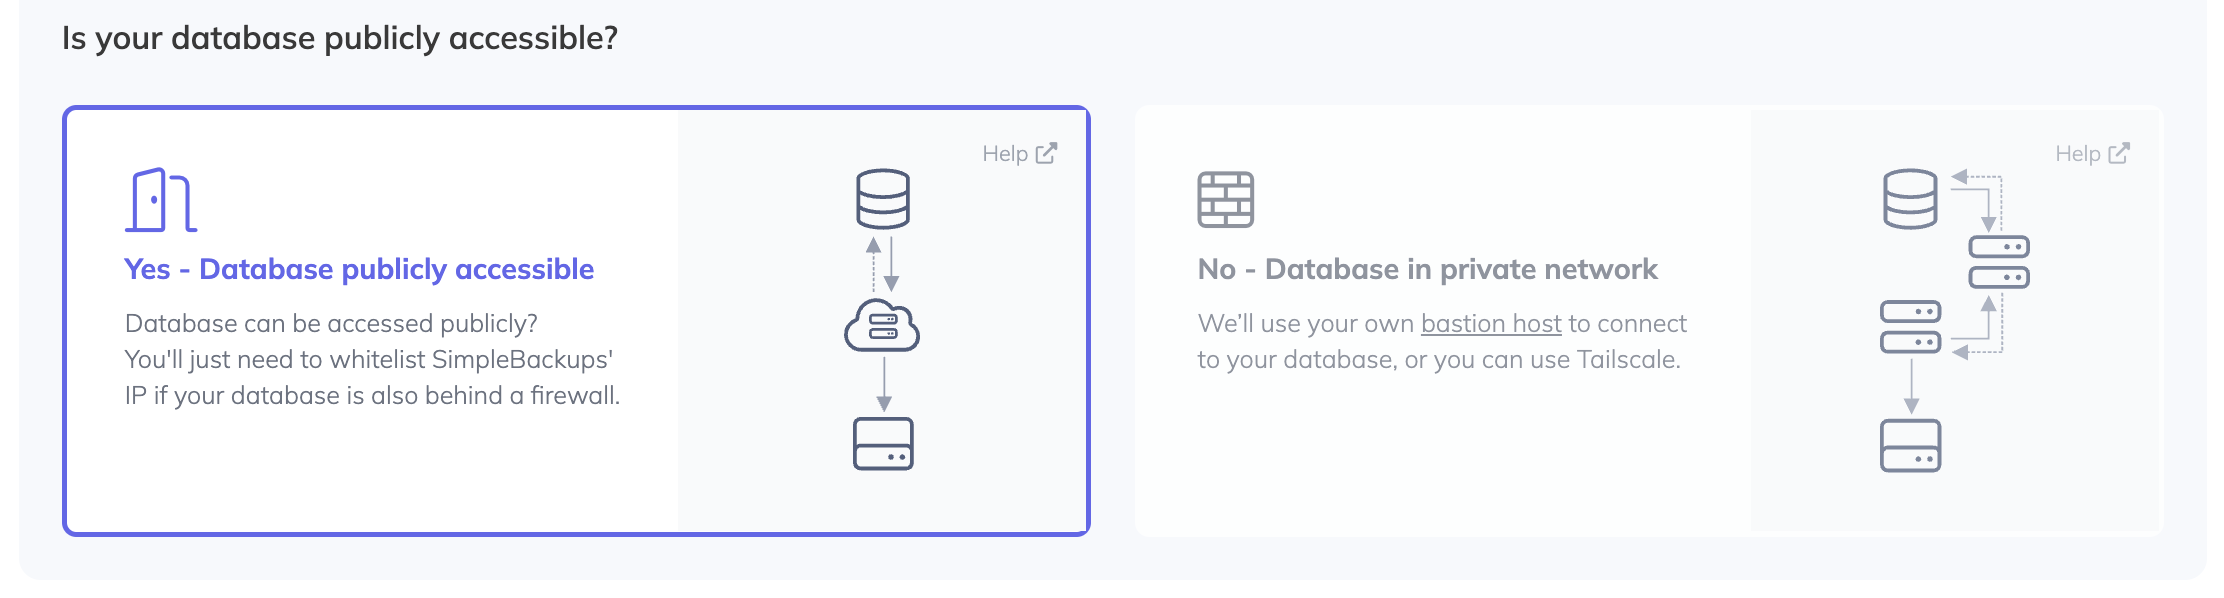
Finally, depending on your unique setup, you might also need to whitelist SimpleBackups’ IP addresses. Doing this allows SimpleBackups to schedule and run your database backups.
We’ve provided instructions to do this in our support documentation. In the support documentation, we’ve also provided the IP addresses that you should whitelist.
Step 3: Connect Your RDS Database
The next step is to connect SimpleBackups to your database. To do this, there are several steps you’ll need to follow:
- You’ll select PostgreSQL from the Type dropdown list if it’s not already selected.
- In the Host text box, you’ll paste the endpoint that you’ve obtained earlier.
- You’ll enter the port number for the connection in the Port text box. When setting up your database on AWS, it will also set port 3306 as the default. However, if you’ve changed the port number when setting up your database, you should enter it here.
- In the User text box, you’ll enter the username for your database that you’ve obtained earlier.
- In the Password text box, you’ll enter the password you set when setting up your database on RDS.
- Finally, you should provide the database name in the Database name text box. You’ve also obtained this information when you retrieved the connection credentials earlier.
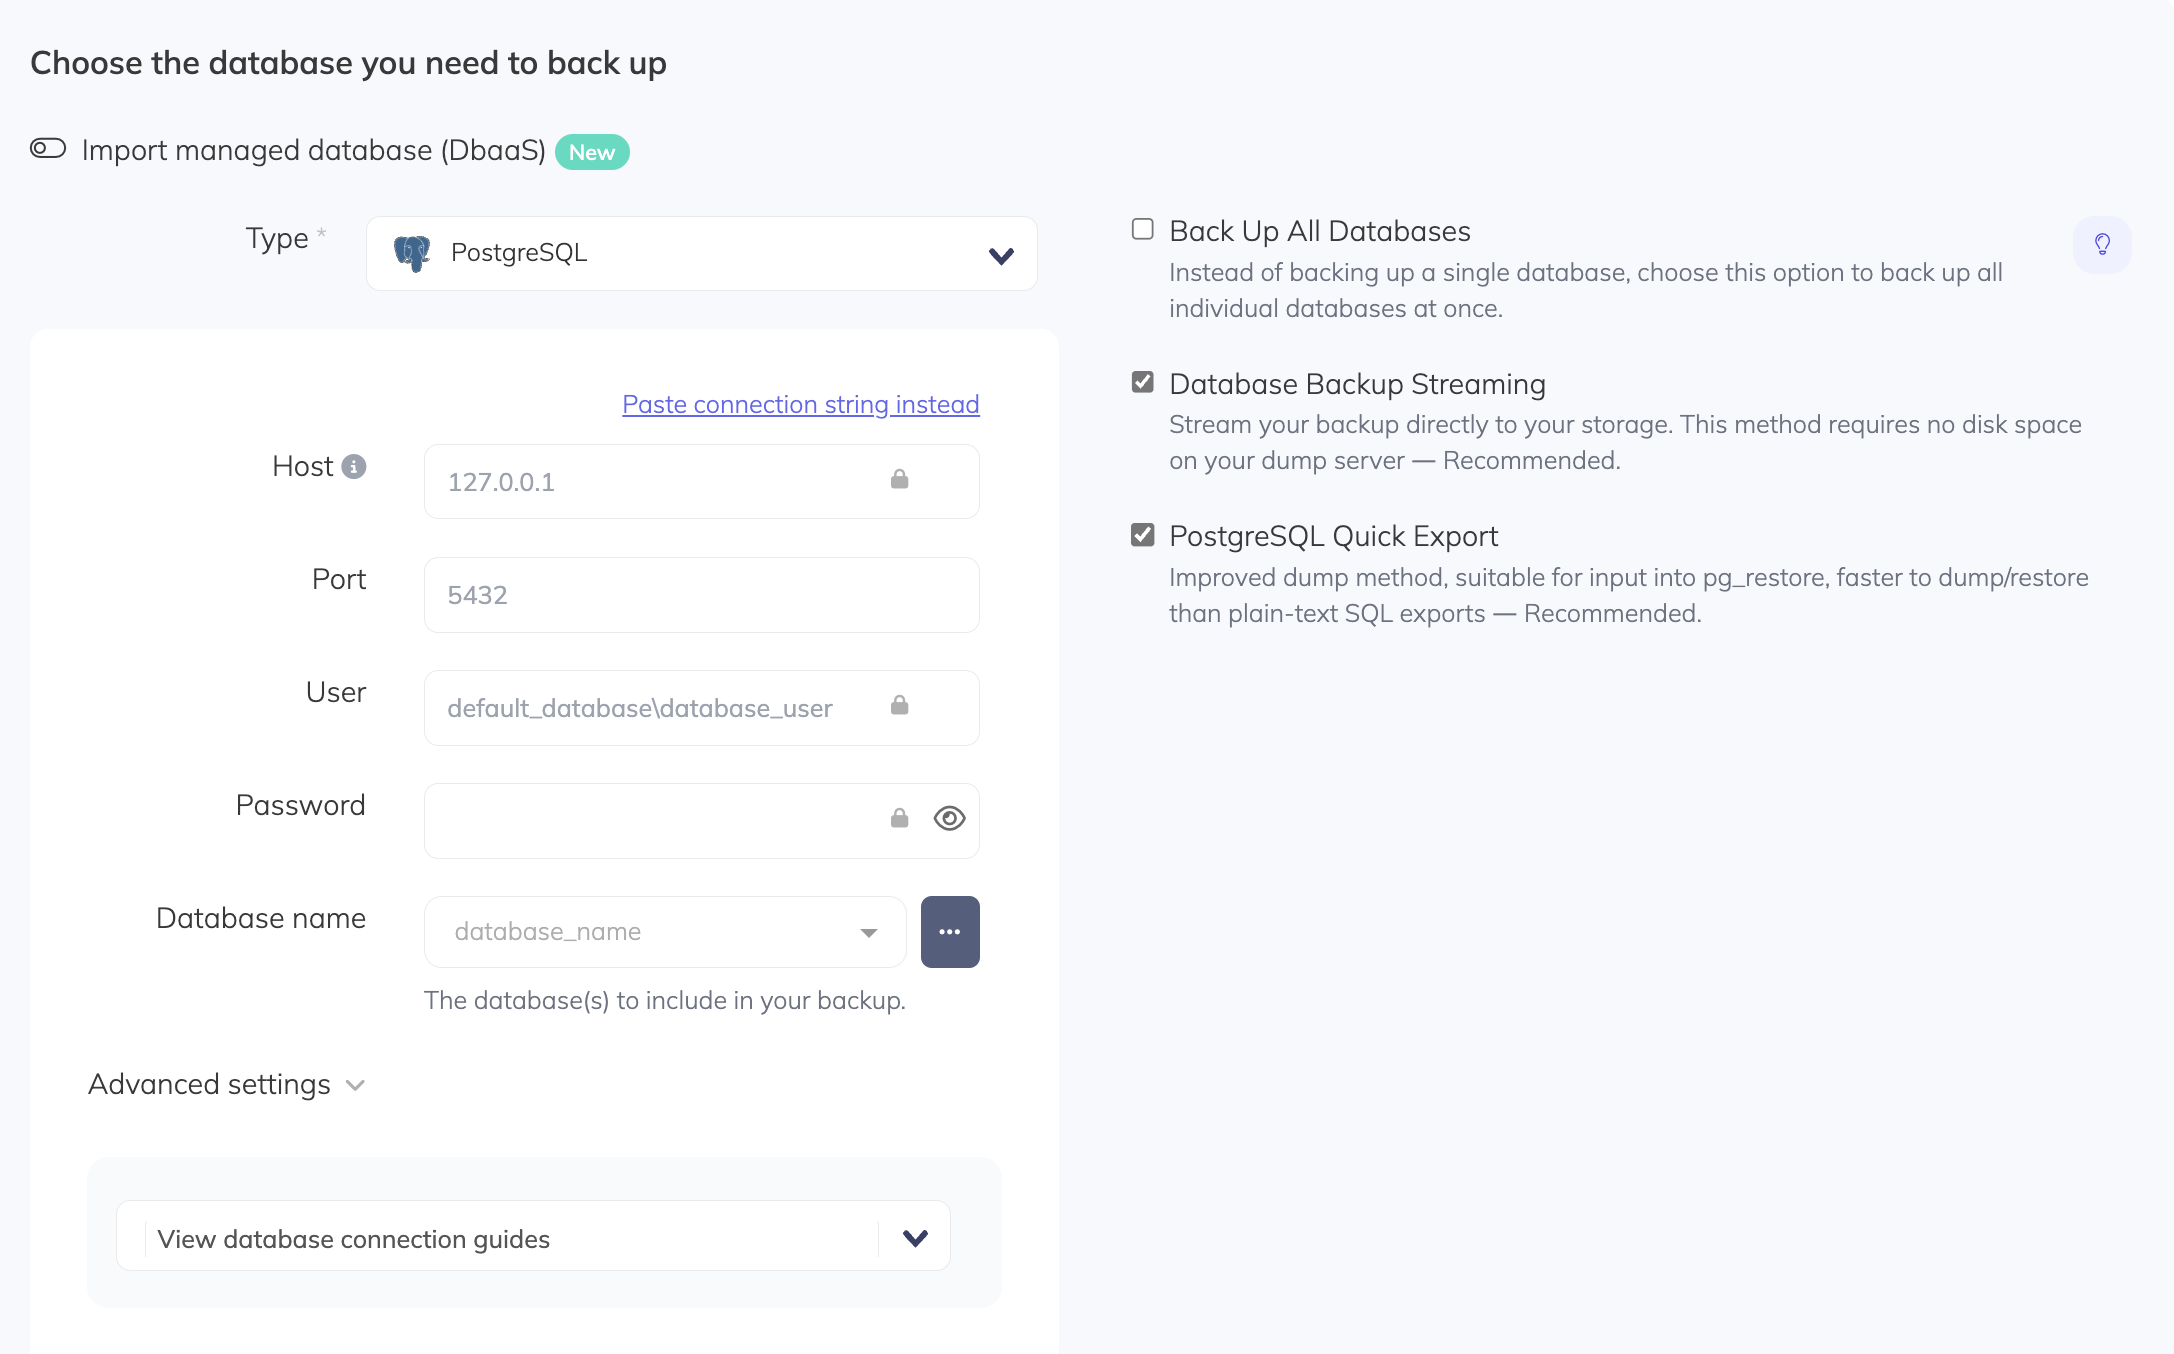
As you can see from the screenshot, you can also choose the type of backup you’d like to run.
As you can see from the screenshot, you can also choose the type of backup you’d like to run. For example, stream your backups directly to your storage to save disk space, or perform a PostgreSQL Quick Export that provides an improved dump method.
\
Once you’ve provided all the details of your database and selected the type of backup you’d like, you can click on Validate Connection.
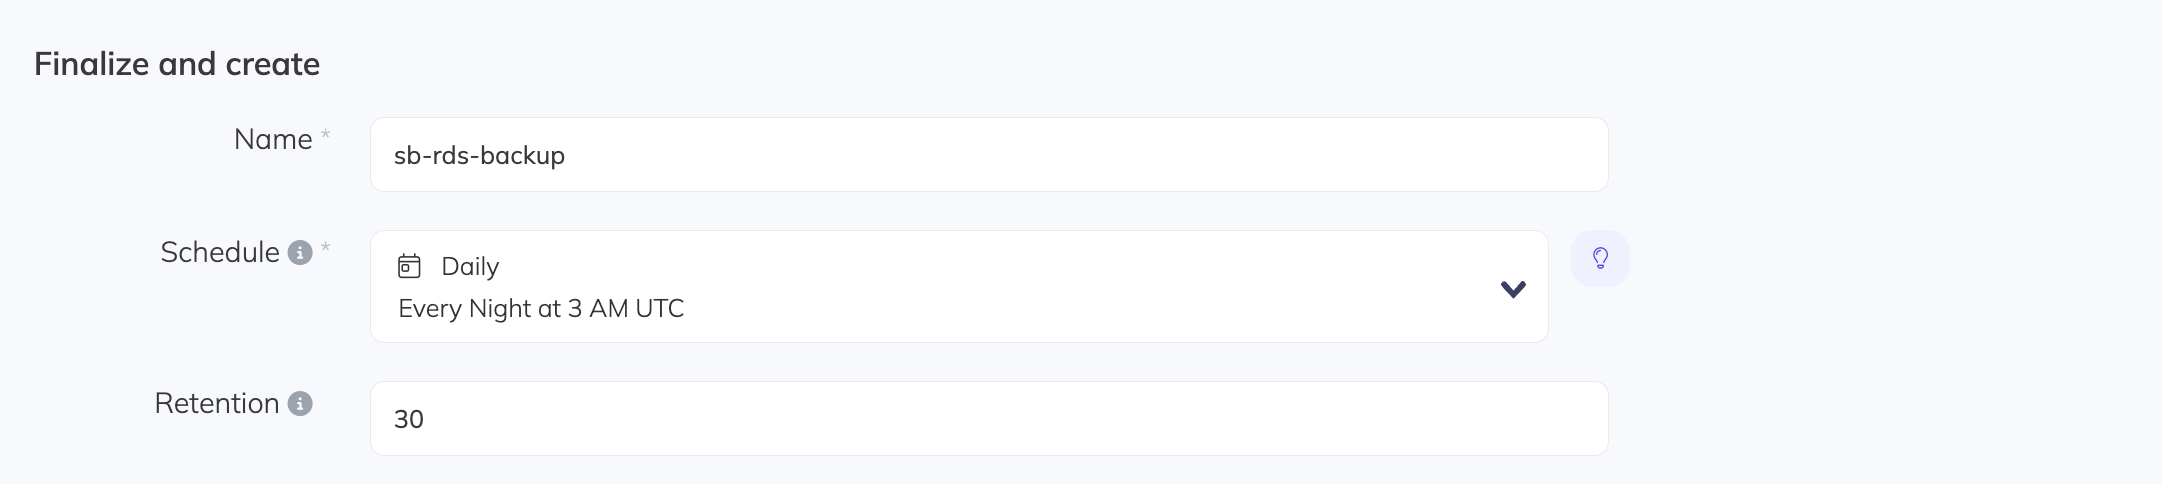
Step 4: Schedule Your RDS Backup
With your database connection set up, you can now perform the final tasks to create your backup. Firstly, you’ll need to provide a name for your backup. Next, you can schedule your backups based on your requirements.
There are a few options. For instance, you can run your backups on demand. You can also run them daily, weekly, or monthly at specified times. It’s also possible to define a custom backup schedule, which allows you to schedule backup intervals of as little as 1 minute.
At this stage, you should also set your backup’s Retention. This is the number of recent backups that you’ll keep. If you reach this threshold, older backups will automatically be deleted.
Step 5: Choose Your Storage
The final step in creating an RDS backup is choosing your storage. You can choose if you’d like to use your own remote storage or SimpleBackups’ own storage solution, SimpleStorage.
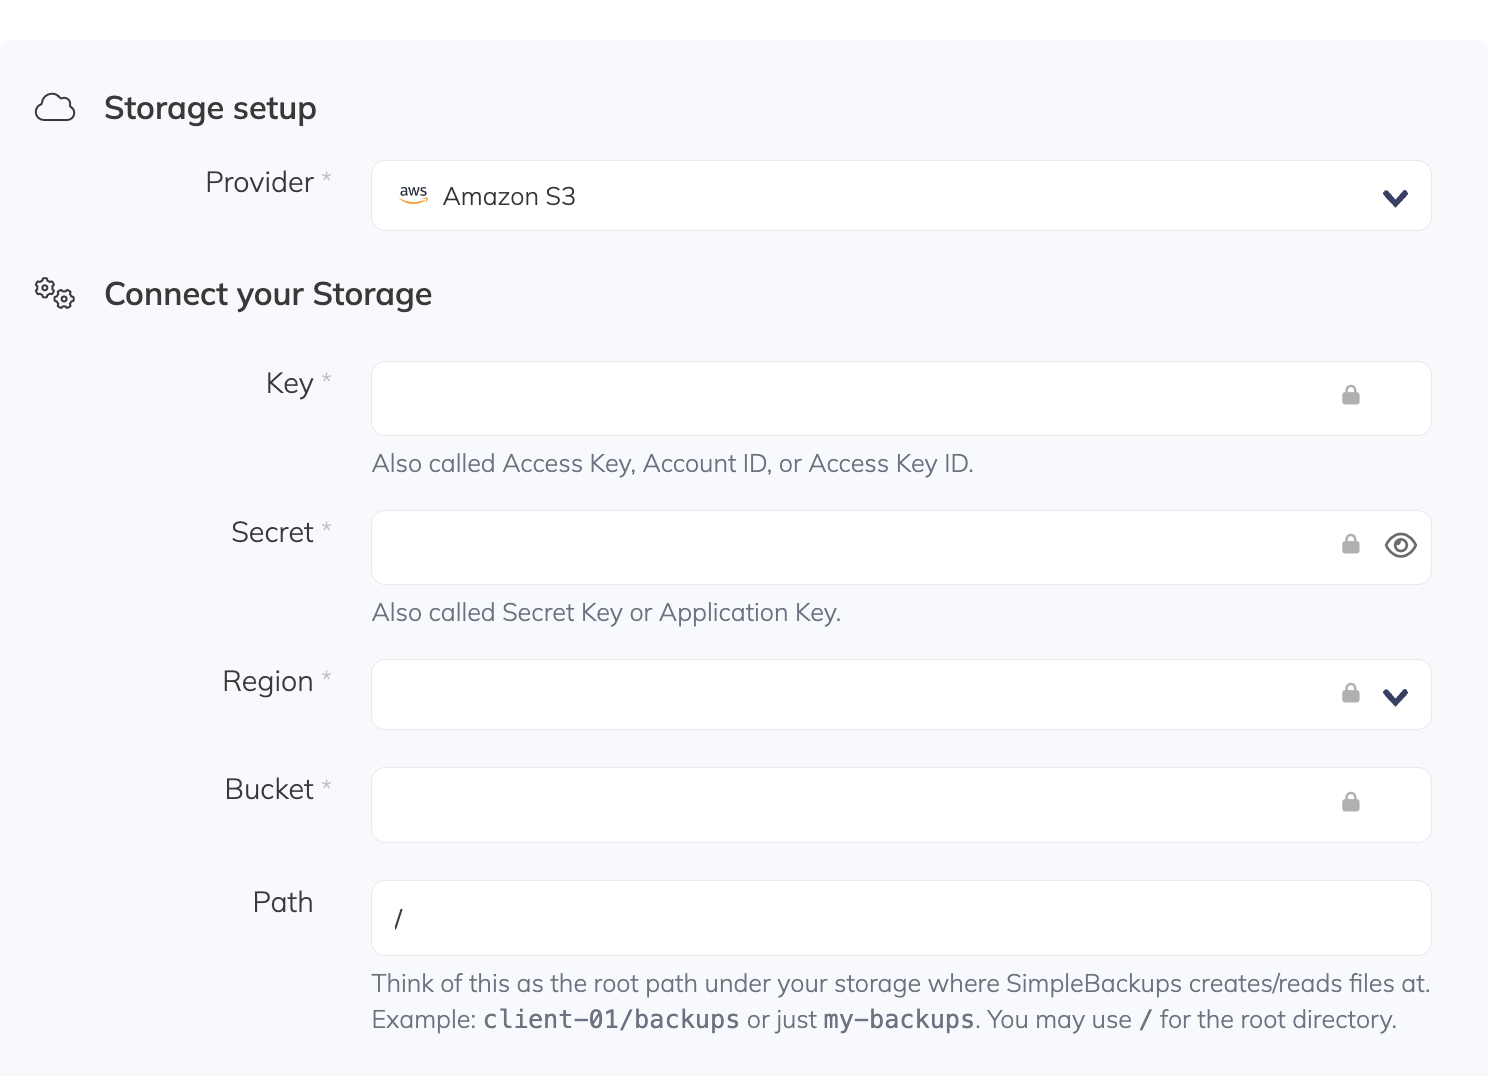
If you choose to use your own remote storage, you can choose from several options, including Amazon S3, Dropbox, Google Cloud Storage, DigitalOcean Spaces, and more. To add your storage, you’ll click on the Connect storage button.
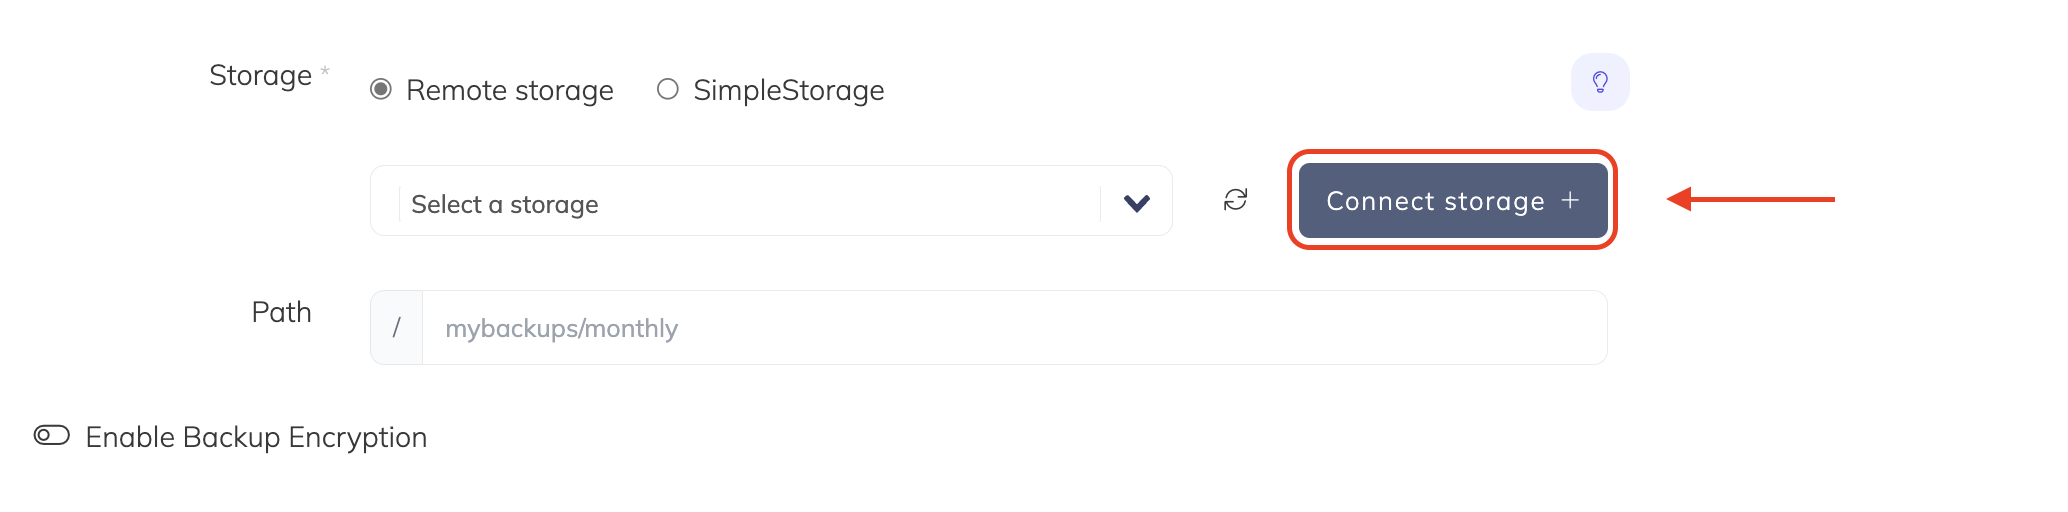
This will take you to a dialog box where you can provide the credentials for your storage in order to connect it to SimpleBackups. You’ll also need to provide the path where you’d like your backups to be stored.
Once you’ve chosen and configured your storage, you can click on Create Backup.
Conclusion
Make sure you can always recover quickly should disaster strike. You don’t even need your own server! And if you’re looking for more robust solutions, SimpleBackups allows you to back up servers and files, replicate your storage across different storage solutions, and get server and volume snapshots.
To learn more about SimpleBackups and how it can help you, create your first backup today.
Back to blog
Stop worrying about your backups.
Focus on building amazing things!
Free 7-day trial. No credit card required.
Have a question? Need help getting started?
Get in touch via chat or at [email protected]


